

The running toilet. For the majority of Kansas City homeowners, this can be one of the most annoying sounds to hear. You hear water constantly running. Sometimes, a quick jiggle of the handle relieves the annoyance. However, we wouldn’t call this a cure to the running toilet. What you have with a running toilet is actually an internal water leak. Aside from just being an annoying sound, it can also waste gallons of water and take a toll on your water bill. The easiest way to cure a runner is to be familiar with the inside workings of a toilet and see which of these elements is off-key. This week, we’ll walk you through everything and get you on the path to deciphering your own plumbing issues (if you could care less, give us a call and we’ll get it taken care of! ?).
➡️Why You NEED to Fix It Today!
Before we get into the anatomy of a toilet, I thought it would be good to hit on the numbers part of a running toilet and how much water can actually be wasted. A typical toilet is usually around 1.5 gallons. For estimating purposes, let’s suggest it takes a full minute to refill the tank (this is being on the conservative side, as it likely can be done in 30 seconds). So, you’ve got 1.5 gallons of water per minute. There’s 1,440 minutes in a day, which results in 2,160 gallons of water per day. Keep that up for 30 days and you’ve got nearly 60,000 gallons of water! While this implies that the toilet is constantly running 24/7, you can probably see the impact it can have. With that much extra water on your bill each month, I’m sure you’ll start notice a difference. Now, let’s take a look at what is creating this running water problem.
 ✔️Test the Flapper.
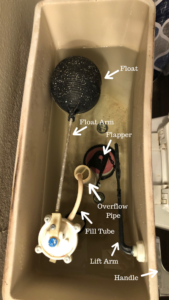
More often than not, what will be causing your toilet to run is the flapper. If the flapper doesn’t seal 100%, then you’ll have a leak. When you flush a toilet, you’ll see that float arm raises and lifts up the chain attached to your flapper. Once this happens, water can enter the toilet bowl. When the correct amount of water has entered, the flapper will seal back up. If your flapper is cracked, guess what? You have yourself a running toilet. What you’ll need to do now is turn off the toilet’s water supply and flush the toilet to get all of the water out. You’ll unhook the old flapper and install a new one. Since flapper’s are so cheap, there’s no point in trying to make a patch-work repair. Just replace it completely and you’ll be good to go!
✔️Watch the Chain.
When the float arm raises up the flapper’s chain, keep an eye on the length. If it’s too short, it won’t seal completely. Conversely, if it’s too long, you run the risk of it getting caught underneath when the flapper closes, thus letting water seep through. The chain length can be easily adjusted by looking at where it’s connected to the lift arm.
✔️Cracked Float Ball?
The next potential culprit of your running toilet is the float and float arm. Your float has a very important job! After flushing, you’ll notice the water slowly starts to build back up. When the float ball rises to a specific point, it closes off the water. Much like the case with the flapper, you’ll first want to examine your float and make sure there’s no cracks in it. A cracked float will let water into the actual float and it’ll sink to the bottom of the tank. As a result, your toilet will think that it needs to bring in more water and will do so, hence the running. Your overflow pipe will let in this extra water. The solution to this is simple, you’ll need to replace the float ball. If it’s just a crack in the float ball, you’re actually in luck as it won’t do much damage to your pocket. At Home Depot, they’re under five bucks!
✔️More Float Talk.
If your float ball is still in perfect condition, you’ll need to check out the float arm next. If the running noise starts whenever you lift the float arm, you may very well be onto something. Remember the importance of the float ball? It lets the toilet know how much and when it needs water. So, if the float ball isn’t getting high enough, then it might give off a false impression that more water is needed. Check to see if there’s anything impeding it from getting high enough. Is it hitting the side of the tank? This seems to be the common issue here, but all you’ll need to do is bend the arm slightly so it doesn’t hit the sides anymore.
 ?Still Not Fixed?
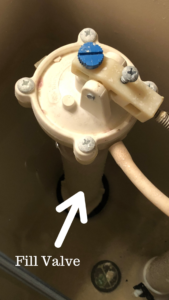
After you’ve tested all of the areas above and even tried changing the set-up of the float arm, you might be replacing the fill valve. This is a little more trickier of a repair than those above, so it might be best to call an experienced Kansas City plumber if you’re not too confident. What you’ll need to do first is turn off the main water supply and flush the toilet to remove all the water from tank. Once this is completed, you’ll unscrew the nut below the toilet tank and remove the old fill valve.
Once this is completed, you’ll simply install the new fill valve. You’ll notice there’s a “Critical Level” mark on the fill valve. Your overflow pipe should be right around an inch lower than this critical level mark. If it’s too high, you’ll probably need to get a hacksaw and shorten the overflow pipe. Once this is installed, you’ll re-attach the fill tube and make sure everything else is as it was before. Again, this is a slightly more complex DIY repair job than flapper or float replacements, so make sure you know what you’re doing before tearing anything out! Last thing we want is for you to have water spraying everywhere!
One other possibility that would fall under the label of something that shouldn’t be DIY is the ballcock assembly. However, for those ambitious plumbers-in-the-making, we’ll give you a few quick tips here! First and foremost, if you opt to try and replace the ballcock assembly, make sure you take the old one with you when you head to the home improvement store. Unless you’ve seen thousands of assemblies, you may not know all the lingo that goes with it. When deciding between plastic and metal, we always recommend rolling with metal ballcock assembly. Although it might a little bit more pricey, you’ll make that money back as it’ll last longer and not corrode like the plastic alternative. Nonetheless, whichever option you go with, you’ll also want to double check the size of the threaded shank. It needs to be the same size as the existing assembly. Otherwise, it won’t be installable. All in all, the installation of a ballcock assembly could easily be a post in and of itself, so we’ll save that for a future week. ?
?Time To Call An Expert.
If you’ve still got a running toilet and are completely lost on why this annoying sound persists, it’s probably time to call in a plumbing expert in Kansas City. As I’ve mentioned throughout this article, most of these repairs can be completed in a few minutes. At the same time, that frustrating running water noise is likely costing you some on your monthly water bill with all of the wasted water. If I can offer you one piece of mind, it’s to not let this annoyance linger on for weeks or even months. Either try to get it decipher the issue area yourself or give our team a call at 816-348-3481 and we’ll get you taken care of quickly, so it doesn’t cost you anymore money!